Showing posts with label cooking. Show all posts

Sunday, December 23, 2012

What's for dinner? 12/23

Crash Hot Sweet Potatoes by Donalyn Ketchum

Here's our meal plan for the upcoming week.

Christmas is this week.  We'll have one dinner Christmas Eve with my family and one on Christmas Day with my husband's family.  I'll likely be helping my mom with her cooking for Christmas Eve.  For the larger family I married into, I signed up to bring my mom's famous yams (sweet potatoes).

My sisters are also both in town this week, so although I plan to cook, impromptu dinners out may be in order!
By the way, if you missed my Two-Week Meal Planner printable, check it out!

This Week:

Monday

Pork Ribs
Baked Beans (new)
Salad

Tuesday
Christmas Eve dinner
Help Grandma cook!

Wednesday
Christmas Dinner
Mom's Famous Yams

Thursday
Grilled Shrimp Scampi
Herb-buttered pasta
Spinach salad

Friday
Breakfast for dinner
Crab quiche bake
Fruit salad

Saturday
Meatloaf pumpkin (new)
Steamed asparagus

Sunday
Seasoned flatiron steak
Homemade refried beans*
Peruvian-style white rice


*Notes:  Dry Beans

We used to buy all of our beans canned.  They're so easy to use!  I tried using dry beans long ago, and I could never time the soaking enough ahead of the cooking so they'd be ready.  I tried doing the hot soak method where you bring them to a boil, cover, and remove the heat, and wait.  They were always weird looking afterward.  Then I learned about using the 90 minute no-soak method.  It changed my life!  I now make a whole bag of beans, use some and freeze the rest in can-like portions.

In case you're wondering, we still buy some canned food (but not nearly as much as before) to limit our exposure to potentially harmful BPA in can lining, especially for our kids.

Saturday, October 27, 2012

Meals for the Week

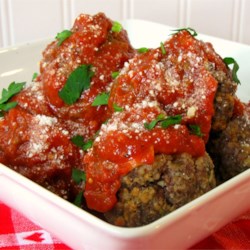
"Meatball Nirvana" from allrecipes.com
Each week I will be posting our meal plan.

Sometimes we just get in a rut with our cooking, and so I try to include at least one new recipe a week.  Sometimes I get adventurous and do three a week.  This week I have two, relatively safe choices.

I also try to avoid having the same meat two days in a row, but that doesn't always work out.  We aim for one seafood item a week, but depending on prices, sometimes we don't.  There is almost guaranteed to be one whole-chicken dinner and one dinner using ground beef, though.

I don't live and die by my own meal plans, but they are great for keeping organized.  I am quite alright with switching up the days or modifying my plan if anything comes up.  We buy less food now, 
things rarely go to waste, and we have great leftovers for lunch!
By the way, if you missed my Two-Week Meal Planner printable, check it out!

This Week:

 Sunday


Salmon Quiche (using leftover salmon from Saturday's dinner instead of the crab that is called for)
Salad

Monday
Picante pork over rice
Roasted vegetables

Tuesday
Mashed potatoes & salad

Wednesday
White bean soup with chicken

Thursday
Steak
Roasted potatoes & peas

Friday
Salad

Saturday
Spaghetti with meatballs
Salad & Garlic Bread

Thursday, October 25, 2012

Salsa Verde Experiment

I have been getting produce from a produce co-op.  If you don't know what that is, check out Bountiful Baskets.  The one I participate in isn't unaffiliated with BB, but works in much the same way.

Anyway, I opted for a specialty basket the last time around, and ended up with a bagful of tomatillos.  Having never used them for anything, I immediately googled "tomatillo recipe".

Salsa Verde (green salsa), of course! So I'm making some for dinner tonight.  I'll be testing Tomatillo Salsa Verde from AllRecipes.com.

Tuesday, June 5, 2012

Meal Planning!

It sounds daunting, and at first it is.  But planning our dinners has saved me a lot of 4pm frustration.  What do I make for dinner tonight?  What can I make in the time I have until everybody starts grumbling from hunger?

A friend gave me a binder with some very cute weekly meal planner pages in it, and I dove right in.  At first it was more difficult, so I only planned one week at a time.  We usually do our grocery shopping twice a month, so that left a good chunk unplanned.  But now that I have the hang of it, doing two weeks worth of planning takes me less than an hour.

This not only saves me money (little to no food goes to waste), but also time.  An hour of planning includes looking through my grocery store sale ad, their online coupons (which load onto the loyalty card), and browsing through old plans for meals I want to repeat.  Then if I don't have enough ideas, I check out my amply filled recipe box on AllRecipes.

I do my grocery list digitally through the OurGroceries app or website.  My husband and I both have the app on our phones, and it is very handy because it's immediately updated.  That means if one of us is at the store and the other remembers an item and adds it, it's instantly added to the list.  We also have separate lists on there for the grocery store, Costco, and the hardware store.  There are several list apps out there, so check them out.  Very handy and no notepad to lose or forget.

Back to meal planning.

The meal planner I have been using is one-week at a time, plus a column for the grocery list.  Since I do my list digitally and do two weeks at a time, I decided to whip up my own printable planner.  Now I'm sharing with you.

click to view/download
Some tips for getting started meal planning:
  • Tip #1:  Use a template  Print out my printable meal planner in glorious color (or to save colored ink, set your printer to grayscale).  It can be used for multiple meals per day, but I only use it for dinners.  Or, use another planner (just do a search, there are many out there) that suits your shopping/cooking/organizing style better.  You can keep many copies in a binder, or hang it up on your fridge.  Whatever works best for you, do that!
  • Tip #2:  Use pencil!
      I have no idea how many times I've accidentally ended up with three chicken meals in a row.  I need variety.  I change my mind.  Using pencil means I can erase as needed and not make a mess of things.
  • Tip #3:  Consider cooking & prep time
      On days you know you'll be busy, plan a crockpot meal.  Plan a couple of easy dinners.  If you mostly cook from scratch, you will not want to make a more complex meal every night.
  • Tip #4:  Be flexible
      Things come up.  You might not have time to make the meal you intended.  If you're lucky, somebody will take you out to dinner.  That will not ruin your plan.  You can shift your days or switch them around.  Just make sure nothing in your plan for the skipped day will go bad before you can use it.  This is another reason to use pencil!
  • Tip #5:  Look ahead
      If you've frozen that whole chicken, don't expect to start cooking it an hour before dinnertime.  I once thought I had plenty of time to make Kalua Pig in my crockpot when I brought out the frozen pork roast first thing in the morning.  Then I looked at the recipe which said to cook it for 20 hours.  Oops.  This is where I forgot Tip #3 and remembered #4.  If something needs to be prepped the night before, make a note of it in the previous day's notes.  On occasion, I have also set reminders for myself on Google Calendar which sends me a text at a prescribed time.  Yes, I am that forgetful.


Monday, June 4, 2012

National Donut Day

On Saturday we celebrated a belated National Donut Day.

I am a huge advocate for homemade baking, but since seeing this old-timey recipe (more like technique) on Pinterest I've had it in the back of my mind.  A couple of weeks ago we were driving through town and the boys were lamenting that the local Krispy Kreme shop closed and is being remodeled into a bank.  They were pretty distraught.

A few days later, one of them asked me when we can have donuts again.  Of course, we love the dreaded donut.  We try to have them very infrequently, but they are a nice treat.  You can't be a cop's family without the occasional donut!  So the next time I went to the store, Pin in mind, I bought a can of Pillsbury Grands (southern style, I think?).  They came 8 to a can, but I think the smaller ones work just as well.

I have never fried anything before, so heating the oil was a bit of trial and error.  The recipes I read said to use medium heat, and that's what I recommend below.  On my glass-top stove, medium heat (5) was just too hot.  The test-donut I made came out brown and not golden like it should be.  So I turned it down to about 3-4 (on the dial) and that seemed to work out fine.  I would suggest you try a something just below medium for a trial run if you haven't done this before.  It's a lot easier to heat oil up than to cool it down.

Overall, though, it's a very simple thing to do.  It's messier than it is hard.  But maybe that's just me. :)

Ingredients

Donut
1 can refrigerated biscuits
canola oil (enough for about 1/2 inch in the pan)

Glaze
1/4 cup milk
1 tsp. vanilla extract (or whatever flavor suits your fancy)
2 cups confectioner's (powdered) sugar

Tools

Frying pan
Small pot

Whisk (or spoon)
Turner
Cooling rack (with paper town or plate under it to catch drips )

Directions

  1. Heat oil in frying pan over medium heat.
  2. Meanwhile, combine milk and extract in small pot over medium-low heat.  Whisk in confectioner's sugar 1/2 cup at a time until well combined.    Turn off burner and set aside. (I left it on the burner and stirred the glaze before each use.)
  3. Cut center of each biscuit out with a small cutter.  A medicine measuring cup from your Children's Tylenol or a bottle cap works great.  Improvise as needed.
  4. When oil is hot enough, gently drop a donut hole into the pan.  Flip after about a minute.  It should be golden.  Remove after about another minute with tongs.  (If the oil is too hot, the donut hole will be very brown.  If so, reduce heat and try again.)
  5. Dip donut hole in warm glaze and place  Repeat with remaining donut holes and donuts.
We found that if you want to add sprinkles, you should do so immediately after glazing the donut.  It is thin and cools quickly.  Once it's cooled, the sprinkles won't stick.

The verdict on this is yummy, but so unhealthy!  We never buy canned dough anymore, so maybe if we ever want donuts again, a from-scratch version will be in order. 

Friday, June 1, 2012

Unroasting-Pan Roasting Chicken

I have always wanted a roasting pan for making chicken (or turkey) in the oven.  But they are so big and expensive that even though I have looked at them in stores on online, I have never purchased one.

I came across this method somewhere between finding my favorite whole-chicken recipe and finding an alternate version for the crockpot.  I can't remember where I read it, but whomever thought of it was a genius.

Oval-ish squished foil.

Ingredients:

Chicken
Seasonings
Smart Balance (or butter)

Tools:

13x9 pan
Foil

You tear off three squares of foil, squish them into roughly ball-shaped, flatten them a bit, and place them in a 13x9 pan.

*FYI:  I use a Pyrex baking dish, but metal, Corningware, or glazed stoneware should all be should be fine.  I used to use my Martha Stewart enameled dutch oven until it was recalled.

Look ma, no hands.
Then place your chicken on top.  The tail end of the bird goes on the side with two foil balls. You'll have to adjust the foil under the bird so that it's being supported by the foil and none of the chicken is touching the pan.

Now, when you book the chicken according to your recipe, the fat will go to the bottom of the pan, and the chicken won't be sitting in it.  Just like a fancy schmancy roasting pan.

Tuesday, May 29, 2012

Cooking beans from scratch

As a cost-cutting (and preservative/sodium/BPA-cutting) measure I started exclusively buying dried beans last month.  I had tried this before but all that soaking and the subsequent cooking never lined up well with my schedule.  I also tried the quick soak/boil method but I never got hooked.

That is, until I found out about the no-soak method.  No "gastric distress" either, in case you were wondering.  There are several explanations online so I'll spare you the details and give you all you need to know.


Ingredients:

  • 1lb dried beans (I have used pinto, great northern, and black)
  • Cold water


Tools:

  • Oven-safe pot with lid
  • Oven
  • Colander


Directions:

  1.  Turn oven to 250 degrees
  2. Slowly pour beans into pot, picking out shriveled beans and any debris (the former is more likely than the latter).
  3. Add water to cover beans plus a couple of inches and bring to a quick boil.
  4. Immediately cover pot and place in oven for 70 minutes.
  5. Remove from oven and drain.  Use in place of canned beans.

Just a tip:  A regular can of beans holds about 1.5 cups of beans plus about a half cup of (weirdly syrupy) liquid.

The beans do crack/break a little but they're so much healthier than canned that I don't mind... Not only that, I think they have a better texture.  And while they cook I can be busy with something else, and I don't have to plan very far ahead.  I cook the whole one-pound bag at once, freeze a couple of cans' worth, and usually use the rest in a bean soup or to make refried beans.

Friday, May 25, 2012

Empanadas

It's been a long time since I've been to Peru.  (Remedying that situation; more on that later.)  Beside my family, what I miss most is the FOOD.  It is SO good.  Before you ask, no, it's not at all like Mexican food.

I know how to make exactly two Peruvian dishes.  One is Arroz con Pollo, which is a name that under-describes this amazing dish.  (Akin to naming your baby "Child".)  The other is Empanadas

I set my mind on making empanadas yesterday and so I thought I would share the recipe so anybody who stumbles upon this post hungry and curious might enjoy some tonight.  They are really very simple and don't take long to make.  This is my grandmother's empanada filling recipe.  I never got to meet her but I'd like to think we'd bond over making these.  Most crust recipes that I've found call for lard or shortening,

Let me warn you, oh picky eater.  This is a beef empanada.  It has egg in it.  Woah.  But wait, there's more.  There are raisins in it.  Yes.  I know it sounds weird.  But sweet and savory have gotten really "in" lately so really the Peruvians were just were ahead of their time.

The crust recipe is not authentic.  I have tried a couple of recipes for empanada dough and they were utter failures.  Probably lack of experience on my part with pastry dough.  These days I just use my version of my favorite pie crust recipe (no food processor needed), or you could use store-bought refrigerated pie crust.

Empanadas De Carne  

Makes 12 empanadas

(Crust)

> Original Recipe by Dana on Allrecipes.com

Ingredients

  • 1 1/4 cups all-purpose flour
  • 1/4 teaspoon salt
  • 1/2 cup butter, chilled and cut into chunks (I cut it in half lengthwise and then into eighths width-wise)
  • 1/4 cup very cold water

Directions

  1. In the bowl of a food processor, combine flour and salt. Add in half of the butter chunks, pulse a few times, then add in the rest of the butter.  Pulse until mixture resembles coarse crumbs.
  2. Add in half of the water and pulse a few times.  Add in remaining water a little bit at a time, pulsing in between additions until mixture forms a ball.
  3. Flatten ball to about 2 inches thick, wrap in plastic and refrigerate.

(Filling)

Ingredients

  • 1 lb ground beef
  • 1 lg onion, diced
  • 1/2 c raisins
  • 3 eggs, hard-boiled and chopped
  • 1 cup water
  • 2 tbsp flour
  • 1/2 tsp cumin
  • 12 greek black olives, diced
  • 1/2 tsp paprika
  • 3 tbsp olive oil
  • salt and pepper to taste

Directions

  1. In a small bowl stir flour into water. Set aside.
  2. In a large skillet, saute onions in oil. Add ground beef, olives, cumin, and paprika. Stir and cook until beef is browned.
  3. Pour flour/water mixture into beef mixture until well combined. Stir in raisins. Cook until raisins plump. Gently fold in eggs. Add salt and pepper to taste and allow mixture to cool.

  Assembly

  1. When filling is ready, roll out pre-made crust dough to 1/8" thick. Cut out 12 circles.  (I used my flour sifter, which is 4.5" in diameter.
  2. Work with two circles at a time.  Keep remaining dough in refrigerator while you work.  Roll out each circle a bit flatter.  Place 1/2 cup of filling in each. Fold in half, pressing edges together firmly.  (I fold the edge over in half to make it more secure.) Use fork to crimp the seam.
  3. Place on cookie sheet. Optional: For a golden crust whisk an egg and brush it over the crust.  Bake at 400 for 12-15 minutes or until crust is browned.

Traditionally these are dusted with confectioner's sugar when they come out of the oven and served with a lime wedge.


I think these would also freeze well but we've never had any last long enough to be frozen. :)


Tuesday, May 22, 2012

Bacon Ends for the Freezer


While grocery shopping last week I came across an item in the meat department that piqued my interest.  Namely my interest in saving money.  Also my (slightly smaller) interest in bacon.

Not chocolate covered or anything like that.  Just regular bacon.

This was almost regular bacon, except that it was a vacuum pack of "bacon ends and pieces".  It sounds worse than it looks.  And it makes perfect sense.  Sliced bacon is very uniformly shaped, and of course pigs are not so.  So the ends of it get packed and put in the cooler for thrifty people like me to buy at a much lower price.

This is where vegetarians should really click away.

When I cut the pack open, I saw that the pieces varied greatly in size and shape.  There were pieces of sliced bacon, plus large chunks.  Some of the chunks were mostly fat, some of them were all meat.  I was actually a little surprised at how much meat there was in there.

So I came up with an idea to prep the bacon for future use.  I used my kitchen shears to cut the large pieces into manageable sizes, and packed them into muffin pans.  I was a little worried that the bacon, once frozen, would stick to the pan.  For one pan, I used silicone liners.  For the second pan, I lined each cup with my nemesis, plastic wrap.  I need to buy more silicone liners.

I had removed the wrap when I realized this would
be a better post with a picture, so I replaced the
frozen bacon in the pan for their closeup.
I put the pans in the freezer, and once frozen, I removed the (ewww) bacon muffins and popped them in a freezer bag.  Back into the freezer they went, where they await their marriage to onions in the next batch of homemade beans.

Speaking of bacon, if you haven't tried the bacon from the meat counter, you're really missing out.  At least at our Fred Meyer, the bacon is really meaty and not very fatty.  It has a good smoky flavor, too. It's a fairly local brand, Hempler's.  It is not more expensive than the better pre-packaged bacon, but it is higher quality and you can get just the amount you need.

UPDATE:  I used one of these while making beans yesterday, and to my dismay, it's maple-cured bacon.  Bryan is happy about that, but I am not a fan.  I guess this is still a good idea if you like maple cured bacon. :)

Wednesday, May 16, 2012

Homemade Ice Cream


I became the beneficiary of a one-gallon ice cream maker a few months ago. I had never in my life owned one. Only a handful of times had I ever even had homemade ice cream. I finally mustered the courage to give it a whirl for the last birthday party that we hosted.

I used a recipe from the instruction manual, since I wasn't feeling THAT brave. I was really skeptical about FLOUR in the ice cream, but after some mild panic (I didn't give myself enough time) the end product was a really tasty.

Old Fashioned Vanilla Ice Cream


21⁄4 cups sugar
1⁄4 cup plus 2 tablespoons flour
1⁄2 teaspoon salt
5 cups milk*
4 eggs, beaten
4 cups whipping cream
2 tablespoons vanilla extract

Combine sugar, flour and salt in saucepan. Gradually stir in milk. Cook over medium heat approximately 15 minutes or until thickened, stirring constantly.

Gradually stir about 1 cup of hot mixture into the beaten eggs. Add egg mixture to
remaining hot mixture, stirring constantly. Cook 1 minute; remove from heat.

Refrigerate 2 hours. Combine whipping cream and vanilla in large bowl; add chilled
mixture, stirring with wire whisk to combine. Freeze as directed.
*I used 1%, what we had in the fridge at the time.

I learned my lesson to be prepared with plenty of ice and had kept the metal bucket in the freezer so I wouldn't have to remember it for later.  :)

The boys have been begging for ice cream for a few days so I'm looking for a new recipe to try.  I tried making a mint-chocolate-chip one.  It turned out just ok.  I need a good one!

What's your favorite flavor?

Share